


Bad VIB(E)s Part Two: Detection and Hardening within ESXi Hypervisors
In part one, we covered attackers’ usage of malicious vSphere Installation Bundles (“VIBs”) to install multiple backdoors across ESXi hypervisors, focusing on the malware present within the VIB payloads. In this installment, we will continue to elaborate further on other attacker actions such as timestomping, describe ESXi detection methodologies to dump process memory and perform YARA scans, and discuss how to further harden hypervisors to minimize the attack surface of ESXi hosts. For more details, VMware has released additional information on protecting vSphere.
ESXI Logging
Both VIRTUALPITA and VIRTUALPIE stop the vmsyslogd process from recording activity on startup, but multiple logging processes exist across the hypervisor which can still be used to track attacker activity.
Malicious VIB Installation
It was previously established in part one that ESXi systems do not allow for a falsified VIB file below the minimal set acceptance level, even when the acceptance level was modified in the Descriptor XML. To circumvent this, the attacker abused the --force flag to install malicious CommunitySupported VIBs. This flag adds a VIB or image profile with a lower acceptance level than required by the host.
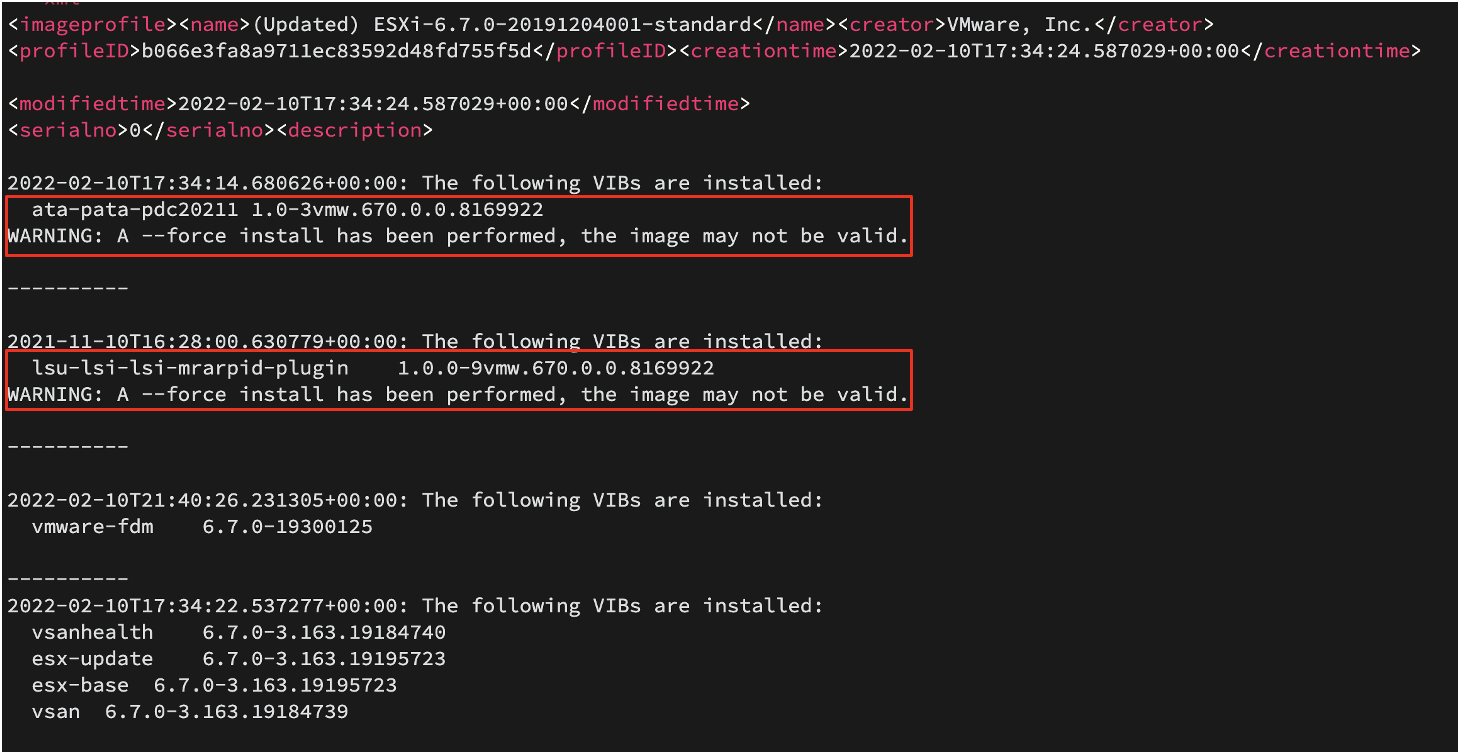
Evidence of the --force flags usage to install a VIB was found across multiple locations on the ESXi hypervisor. The ESXi profile XML file records all VIBs that have been installed on the system, specifying the date, time, and flags used to install each VIB. This file is found under the path /var/db/esximg/profile. Figure 1 contains an example of the attacker’s --force flag usage logged in the profile XML file.
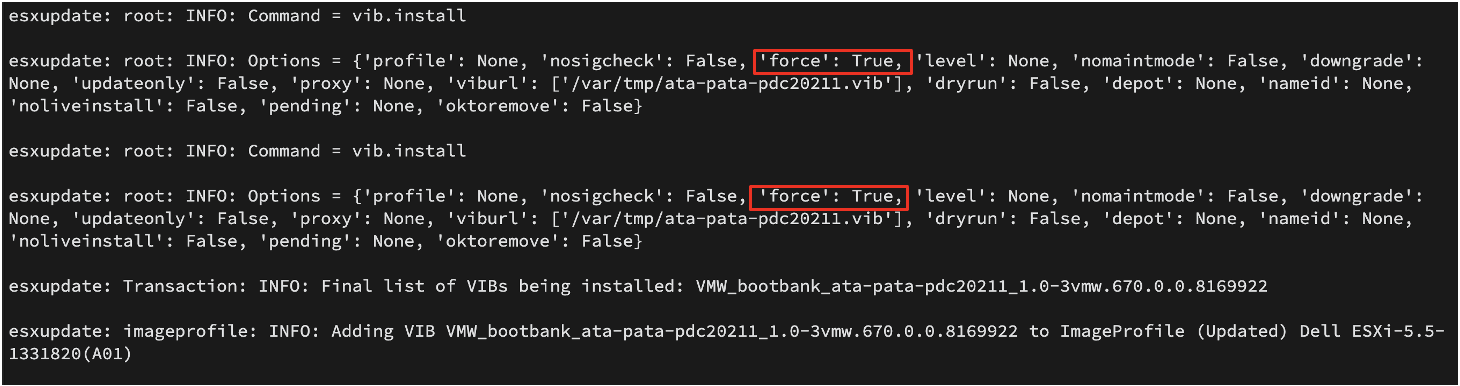
The log file /var/log/esxupdate.log also recorded the usage of the --force flag when a VIB is installed. Figure 2 contains an event that logged a malicious VIB being installed with a forced installation.
Additionally, VMware recommends secure boot enablement, which enables ESXi to validate software, drivers, and other components using cryptographic methods during the initial system boot, determining if those components are legitimate. Per VMware’s guidance, “Secure Boot Support for Trusted Platform Module (TPM) 2.0 in vSphere builds on ESXi Secure Boot by enabling vCenter Server to attest, or validate, the state of the environment by examining data from Secure Boot, as well as system configuration information. vSphere Trust Authority, introduced in vSphere 7, further ties access to encryption keys used for vSAN and VM Encryption to continuous host attestation. Hosts that fail attestation under vSphere Trust Authority are denied access to secrets.
Timestomping
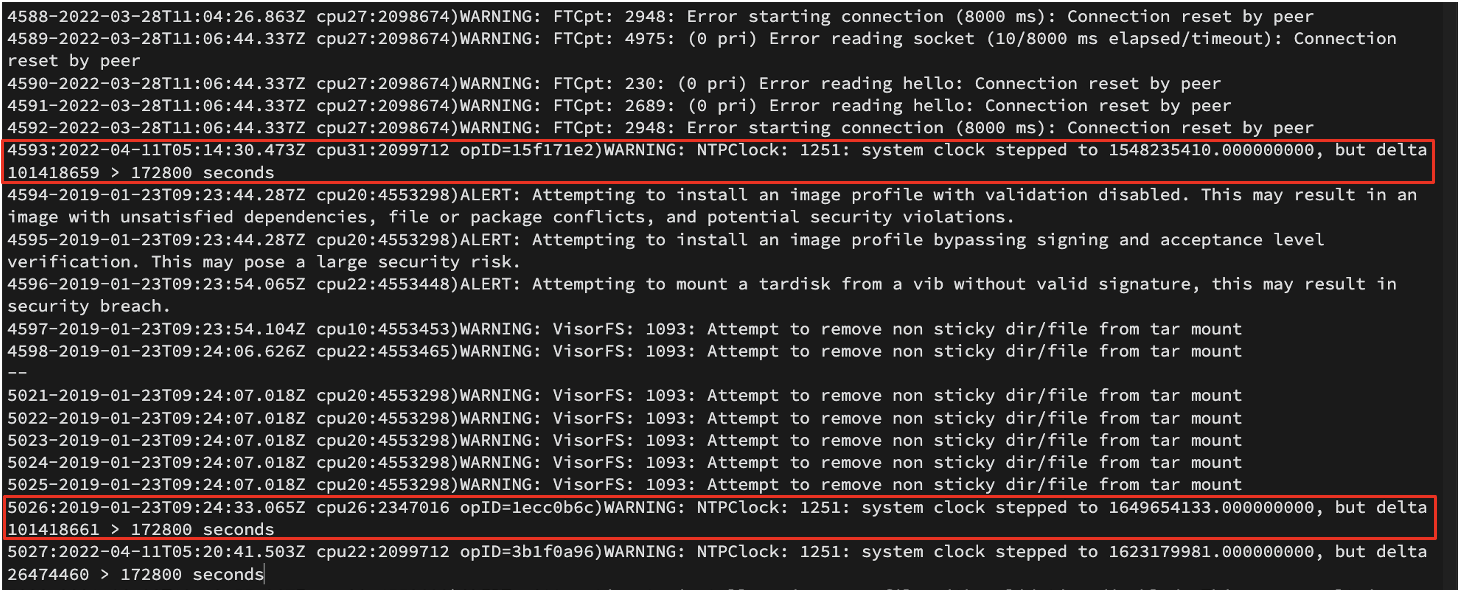
Mandiant observed that logs surrounding VIB installations with the --force flag were recorded as early as October 9, 2013, which did not align with the attack timeline. The log file /var/log/vmkwarning.log provided further evidence of the system time being manipulated. Figure 3 contains two (2) events that logged the system clock being modified right before and after attacker actions occurred. This behavior suggests timestomping was being performed to cover up the true time the attacker initially installed the VIBs on the machine.
Creation of sysclog
Analyzing the VIRTUALPITA sample rhttpproxy-io (2c28ec2d541f555b2838099ca849f965), it was found that the sample listened over the VMCI port number 18098. Once the listener is setup, the malware fetches the system's CID (context ID) by issuing IOCTL request code 1977. The PID of the backdoor, CID and listening port are then logged to /var/log/sysclog in the following format [<date/timestamp>]\n\r[!]<<PID>>:<CID>:<port>\n\n as seen in Figure 4.

Guest Machine Interaction
Further interactions between hypervisors and their respective guest machines were discovered within multiple logs named vmware.log. These logs, located at the following path /vmfs/volumes/…/<virtual machine hostname>/vmware.log, record basic operations between the host and hypervisor that were not logged on the endpoint. Actions recorded by this log include guest machine logins, file/directory creation and deletion, command execution, and file transfer between guest machine and hypervisor. To focus on interactions between the hypervisor and its guest machines in the vmware.log, filter for lines containing GuestOps.
VIB Verification at Scale
The previous blog post touched on using the command esxcli software vib signature verify to identify any VIBs that do not pass the signature verification check made by the ESXi hypervisor. Alternative VIB configurations exist that would be able to circumvent the signature verification check. Mandiant confirmed that when a VIB is installed as CommunitySupported, the Signature Verification field will label it as Succeeded if the payload is not tampered with after installation. This means a VIB could be created without any validation from VMWare or its partners and still be labelled as validated.
To account for properly signed CommunitySupported VIBs and other anomalous configurations, which could indicate malicious activity, VMware has made available a detection script to automate the process of auditing an environment in the “Threat Hunting” section of their mitigation guide.
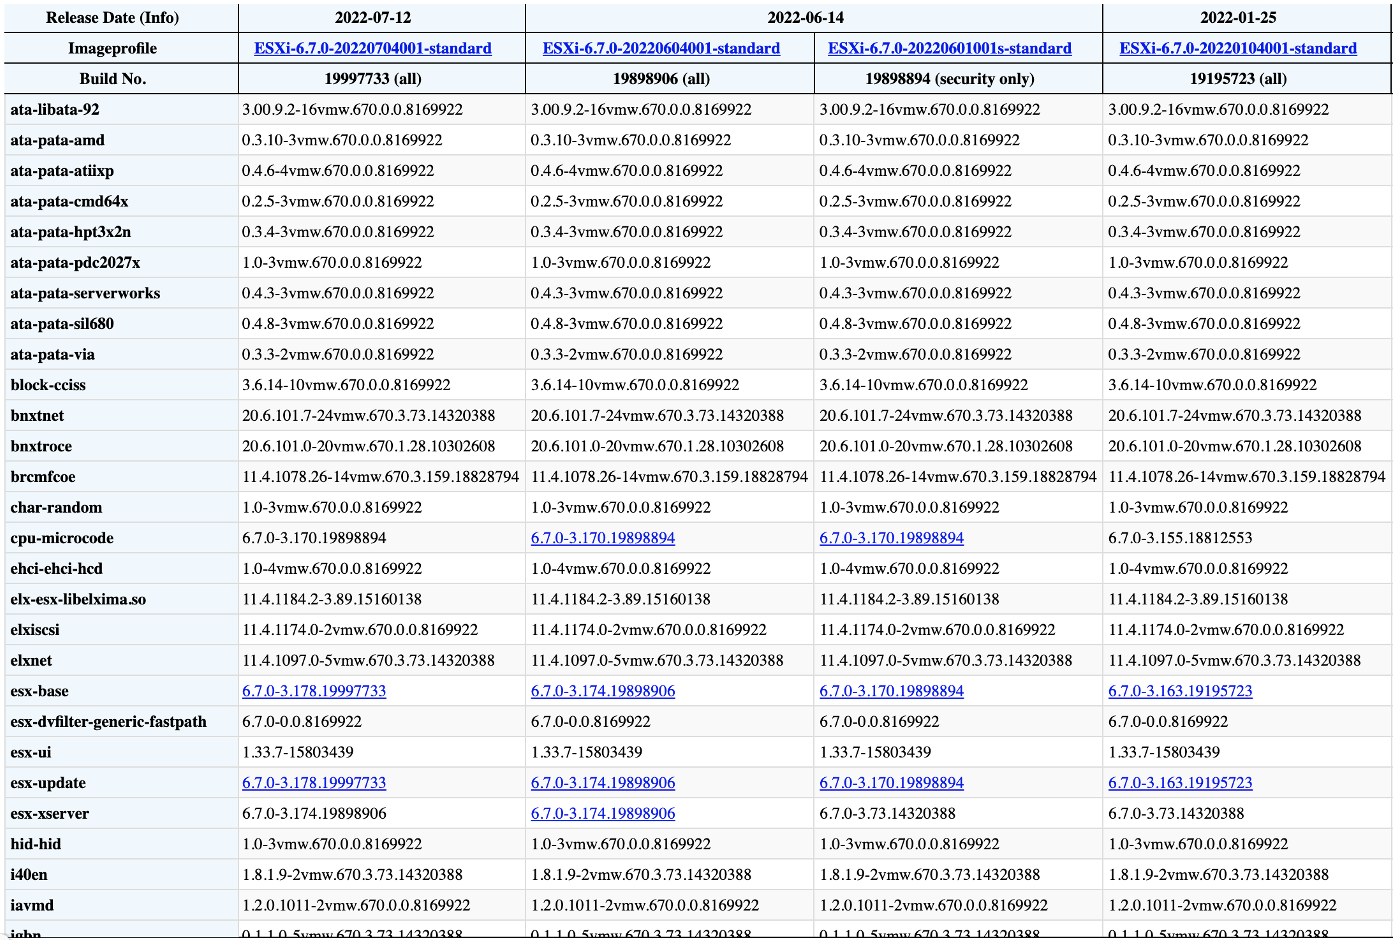
Additionally, all VIBs in the environment can be compared with a list of known good VIBs. A matrix created by VMware Front Experience breaks down the names and builds of each VIB expected to be present by default in the respective ESXi build. Each time a VIB is changed across ESXi builds the matrix links to the official VMware patch release notes which state the adding, modification, or removal of that VIB. A sample of this matrix can be seen in Figure 5.
ESXI Detection Methodologies
While ESXi shares many similarities to Linux (commands, directory structure, etc.), it is entirely its own operating system known as VMkernel, meaning popular methods to scan the filesystem and dump process memory do not work. Mandiant has formulated alternative detections methods to attempt to provide investigators with better visibility into ESXi hypervisors during future incidents.
Remote ESXi YARA Scanning with SSHFS
Multiple YARA rules were generated for the detection of VIRTUALPITA and VIRTUALPIE across Linux and ESXi environments and can be found in the first part of this blog post. These detections have two caveats to them based on the storage and execution of the malware. If the attacker is launching either malware family from a VIB on ESXi, the sample within the VIB will not be detected due to being compressed in the .vgz format. Secondly, if the binary is running in memory but deleted from disk, the binary will not be detected by YARA’s file system scan.
Since YARA does not run directly on ESXi hosts, Mandiant utilized sshfs to perform remote YARA scanning of ESXi hypervisors.
Prerequisites
Note: All behaviors of ESXi and the methodology to dump memory have been confirmed for ESXi 6.7, no other versions at this time have been tested. |
Before scanning the ESXi machine a few prerequisites must be met. For the ESXi machine which the memory is being dumped, you must have both:
- Root Access to the machine
- SSH Enabled on the ESXi Server
Once the ESXi machine is correctly configured, a Linux machine must be setup to be able to communicate over SSH with the ESXi machine. This Linux machine must also install:
- sshfs
- yara
Performing the YARA Scan
Note: Since YARA will naturally recursively scan directories and sshfs pulls files back as they are accessed, scanning the entire ESXi file system can take a long time depending on network bandwidth. This method of scanning is only suggested if a strong and stable network connection is present. |
| Description | Commands |
|---|---|
| Create a directory to mount the ESXi machine on | > mkdir /mnt/yara |
| Mount the ESXi root directory to the Linux machine mount point using sshfs | > sshfs -o allow_other,default_permissions root@<Insert ESXi IP Address>:/ /mnt/yara |
| Scan the mount point which the ESXi system is attached to | > yara -r <Provided YARA Rule> <scope of scan> |
Dumping ESXi Process Memory
When attempting to dump the process memory from a ESXi hypervisor like you would a Linux machine, it will quickly become apparent that the /proc/ directory will be either empty or containing a single PID of the commands used to attempt to dump the memory. To recover process memory from ESXi (and potentially the full binary itself), a mixture of the native tool gdbserver and a github tool called core2ELF64 can be utilized.
Prerequisites
Note: All behaviors of ESXi and the methodology to dump memory have been confirmed for ESXi 6.7, no other versions at this time have been tested. |
Before dumping the process memory a few prerequisites must be met. For the ESXi machine which, you must have both:
- Root Access to the machine
- SSH Enabled on the ESXi Server
Once the ESXi machine is correctly configured, a Linux machine must be setup to be able to communicate over SSH with the ESXi machine. This Linux machine must also install:
- gdb
- core2ELF64
Dumping Memory
Note: The ports to listen and port forward through are arbitrary (Rule of Thumb: Keep between 1024-25565 to avoid commonly used ports), for this walkthrough the listening port will be 6000 and the forwarding port will be 7000. |
To dump the ESXi process memory, gdbserver will be utilized to hook into the currently running process, specified by PID, and listen on an arbitrary port.
| Description | Commands |
|---|---|
| A preemptive check used to make sure that the PID you will be collecting in the next command is the intended one. Please make sure that the output of this statement only shows the process you intend to dump the memory for. | > ps -Tcjstv | grep -e “<Binary to Dump>” |
| Attaches gdbserver to the PID specified in the list processes command, listening on port 6000 for gdb to connect to. |
|
Once listening, the Linux machine will create an SSH tunnel (Port Forward) to the listening port on the ESXi server, where gdb will be used to create a core dump of the process specified.
| Description | Commands |
|---|---|
| Set up an SSH tunnel from the Linux machine to the listening port of the ESXi Server gdbserver process. | > ssh -L 1336:127.0.0.1:6000 -f -N <acct on ESX>@<IP of ESX> |
| Launch gdb | > gdb |
| Within the gdb shell, connect to the gdbserver instance. If at any point you have successfully ran this command and leave the gdb shell, you will need to exit and relaunch the gdbserver process on ESXi to reconnect. | (gdb) > target remote localhost:1336 |
| Create a core dump file of the attach processes' memory in the working directory. The output file should be the following syntax "core.[0-9]{7}". | ?? () > gcore |
Process Extraction
Once a core file is created, the Github project core2ELF64 can be used to reconstruct the program.
| Description | Commands |
|---|---|
Set up an SSH tunnel from the Linux machine to the listening port of the ESXi Server gdbserver process. In the event of the program not being able to recover the first segment, choose the next available segment possible (Smallest Number) | > core2ELF64 <core file> <Desired Output Name> |
Sources
Hardening ESXi
Network Isolation
When configuring networking on the ESXi hosts, only enable VMkernel network adapters on the isolated management network. VMkernel network adapters provide network connectivity for the ESXi hosts and handle necessary system traffic for functionality such as vSphere vMotion, vSAN and vSphere replication. Ensure that all dependent technologies such as vSANs and backup systems that the virtualization infrastructure will use are available on this isolated network. If possible, use dedicated management systems exclusively connected to this isolated network to conduct all management tasks of the virtualization infrastructure.
Identity and Access Management
Consider decoupling ESXi and vCenter Servers from Active Directory and use vCenter Single Sign-On. Removing ESXi and vCenter from Active Directory will prevent any compromised Active Directory accounts from being able to be used to authenticate directly to the virtualization infrastructure. Ensure administrators use separate and dedicated accounts for managing and accessing the virtualized infrastructure. Enforce multi-factor authentication (MFA) for all management access to vCenter Server instances and store all administrative credentials in a Privileged Access Management (PAM) system.
Services Management
To further restrict services and management of ESXi hosts, implement lockdown mode. This ensures that ESXi hosts can only be accessed through a vCenter Server, disables some services, and restricts some services to certain defined users. Configure the built-in ESXi host firewall to restrict management access only from specific IP addresses or subnets that correlate to management systems on the isolated network. Determine the appropriate risk acceptance level for vSphere Installable Bundles (VIBs) and enforce acceptance levels in the Security Profiles for ESXi hosts. This protects the integrity of the hosts and ensures unsigned VIBs cannot be installed.
Log Management
Centralized logging of ESXi environments is critical, both to proactively detect potential malicious behavior and investigate an actual incident. Ensure all ESXi host and vCenter Server logs are being forwarded to the organization’s SIEM solution. This provides visibility into security events beyond that of normal administrative activity.
Acknowledgements
Special thanks to Brad Slaybaugh, Joshua Kim, Zachary Smith, Jeremy Koppen, and Charles Carmakal for their assistance with the investigation, technical review, and creating detections/investigative methodologies for the malware families discussed in this blog post. In addition, we would also like to thank VMware their collaboration on this research.
Prepare for 2024's cybersecurity landscape.
Get the Google Cloud Cybersecurity Forecast 2024 report to explore the latest trends on the horizon.